

It’s a moist, light-textured, flourless chocolate cake made with finely ground almonds, butter, sugar, eggs, and semi- or bittersweet chocolate and glazed with a bittersweet chocolate ganache.
What is the history of Maida Heatter's Queen Mother's Cake?
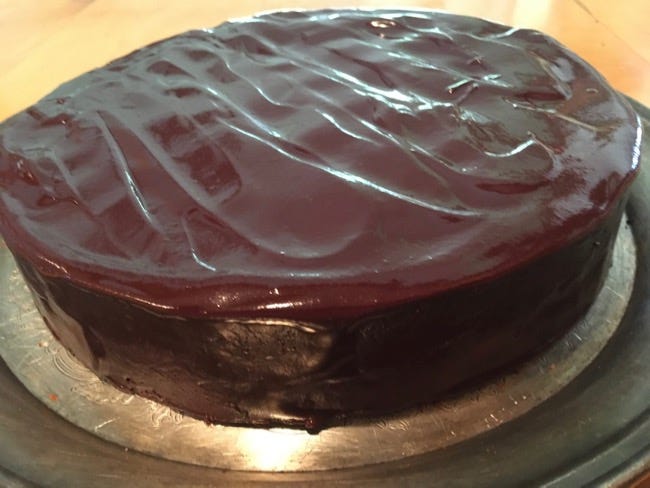
So here's Maida Heatter's most popular recipe, according to Saveur magazine: Queen Mother's Cake. It's a moist, light-textured, flourless chocolate cake made with finely ground almonds, butter, sugar, eggs, and semi- or bittersweet chocolate and glazed with a bittersweet chocolate ganache. Maida published the recipe in her first cookbook, "Maida Heatter's Book of Great Desserts," in 1974. If you search eBay for recipes of that decade, you'll find them in the antique section. Does that make you feel old?
A Cake fit for a Queen.
The recipe itself has an interesting history. Maida got the recipe originally from a 1962 food column by Clementine Paddleford in The New York Herald Tribune. The story says that the Polish pianist, Jan Smeterlin, who loved to cook, collected recipes. He got this chocolate torte recipe when he was on tour in Austria. When the Queen Mother came for tea at the home of some friends of the Smeterlins, the hostess served the cake made from the recipe Jan Smeterlin had given to her. Well, the Queen Mother loved the cake so much that she asked for the recipe and began serving it at her royal gatherings. And that is one version of how the cake got its name. Anyway, I've baked everything from Maida's first cookbook, and let me tell you, she bakes this cake way too long and at too high a temperature. I can't understand how this could happen because she's an absolutely meticulous baker. Queen Mother's Cake appears in several of Maida's cookbooks, and the baking time and temperature are always off the mark. Why? I've searched the internet for different versions of the cake and I've found that the recipe itself is always the same but in a few cases times and temperatures have been adjusted downward from the original recipe. So I'm not alone in saying Maida Heatter bakes Queen Mother's Cake at too high a temperature and too long! Just so you know, Maida's instructions say to bake the cake at 375 degrees for 20 minutes and then to reduce the temperature to 350 degrees and bake for an additional 50 minutes. Total baking time is 1 hour and 10 minutes. I do start the cake in a 375 degree oven for 20 minutes, as Maida says, but then I reduce the temperature to 325 degrees and bake for an additional 30 minutes only. At that point the cake is fully baked and moist.
Gluten free cake recipe.
When Maida first published the recipe, she said to grind the almonds with a nut grinder.

This nut grinder, which I bought in 1976, is fastened to a counter top or table with a screw (bottom of photo). You add the nuts to a hopper (top of the photo), crank the red handle, and out the side pour the ground nuts through the drum below the hopper. The ground nuts are powdery and flaky, and blend into batters with ease. Now here's my problem with ground nut recipes today. Recipe authors say to grind the nuts with a food processor and to add some of the sugar to help the nuts along so that they won't turn into a paste. But nuts ground this way are never powdery or flaky. They're like tiny pebbles and they give cakes a gritty texture rather than a smooth one. Here's a better solution. Buy almond flour or almond meal, the finer the grind the better, and use that instead. You can toast the flour or meal in a small skillet on medium heat, stirring constantly with a wooden spoon or heatproof silicone spatula, until golden brown and fragrant smelling. Scrape into a bowl to stop the cooking. When completely cool, add to the recipe. One final plea: Please weigh your ingredients!

Serving of Queen Mother's Cake. Here's how I make Queen Mother's Cake.